Quiche Lorraine and Company
Season 8 Episode 19 | 28m 58sVideo has Closed Captions
Sudden guests? The French Chef's Julia Child shows you how to bake them a quiche.
Sudden guests? Julia shows you how to bake them a quiche, in this episode of The French Chef. It’s fast, fancy and foolproof. Here’s the ultimate motivation for learning to make your own pie dough. Julia teaches you how to concoct an expert pie-crust dough and use it for open face, main dish pies, such as custard and bacon, spinach, and /or crab.
Quiche Lorraine and Company
Season 8 Episode 19 | 28m 58sVideo has Closed Captions
Sudden guests? Julia shows you how to bake them a quiche, in this episode of The French Chef. It’s fast, fancy and foolproof. Here’s the ultimate motivation for learning to make your own pie dough. Julia teaches you how to concoct an expert pie-crust dough and use it for open face, main dish pies, such as custard and bacon, spinach, and /or crab.
How to Watch The French Chef with Julia Child
The French Chef with Julia Child is available to stream on pbs.org and the free PBS App, available on iPhone, Apple TV, Android TV, Android smartphones, Amazon Fire TV, Amazon Fire Tablet, Roku, Samsung Smart TV, and Vizio.
Providing Support for PBS.org
Learn Moreabout PBS online sponsorshipHaving sudden guests?
Bake them a quiche.
It's fancy, but it's also fast and foolproof.
And you can, but you don't have to, grow your own pie crust.
We're doing quiche Lorraine and company today on The French Chef.
♪ ♪ NARRATOR: The French Chef is made possible by a grant from the Polaroid Corporation.
Welcome to The French Chef.
I'm Julia Child.
These are quiche.
They're open-faced French tarts made out of cheese, or spinach, or...
They're wonderful for lunch, with just a salad and a bottle of wine.
And the wonderful thing about them, too, is that they're foolproof and they're fast.
It's just eggs and cream and flavoring baked in a pastry shell.
And you don't have to make the pastry shell.
You can buy it ready-made, like this one, or you can make it yourself, and use the electric mixer and really go the whole hog.
So I think that's one of the great things about them.
That... they look so attractive and that you can do... that you can do it very fast, either in a bought shell or you could have the experience of making a great French pastry dough yourself.
And the pastry for-- a pastry dough for a pie shell is made out of flour and fat of some sort and water.
And you have to have all of the fat, which I'm gonna get, very cold and chilled.
And the fat, which is butter or butter substitute, makes the pastry shell very tender and flaky, and the water just holds everything together into a dough.
I'm gonna start this... (clears throat) ...in the machine just to show you how fast it's gonna go.
But I'm gonna do it first in the machine-- start it-- but I'm gonna discuss what we're doing.
Now the proportions that are for this dough, where they're going to make two eight-inch pie shells, and I have in this bowl one and three quarters cup of flour, and one teaspoon of salt, and a little pinch of sugar for color.
And the flour I like to use when we're doing it in the machine is that rather granular, sandy type that's called instant blending, or quick blending, that's put out by both of the big flour companies and just look for it on the supermarket shelves.
And...
This is going to be enough for two eight inch shells.
And then we're gonna have, you want to have the fat, and you have two tablespoons of chilled lard or white vegetable shortening, and then one and a quarter sticks, which is five ounces, of chilled hard butter, cut into little pieces.
And the reason you cut it into pieces is just to give yourself a fast start.
What you're trying... What you're gonna do, your first step, is to blend the fat and the flour so that it turns into a very fine, granular substance like this, and I'm just gonna show you what this looks like.
You see, that's the fat and the flour who've been blended together so that it looks like a rather coarse meal.
And you want to stand right over your machine when you're doing it.
You can do it in a table machine, or you can do it within a portable, electric machine.
But stand right over it because you don't, under any circumstances, want it to mass up.
It's to stay cold, and that's why you start things... start things chilly.
And the fat in that was one and a quarter sticks of butter and two tablespoons of shortening of some sort, and one and three quarters cups of flour.
Then you have one half cup of chilled water that goes right in all together into your machine.
And you just let that blend until it's just massed together.
This again-- See, this has been very cold, so it takes it a little while to mass together, but there, it's massed, so immediately stop.
And out it comes.
You'll see that's tremendously fast.
That was... Heavens, maybe two minutes at most.
And I think the reason the machine is good is that you can get into terrible trouble if you soften your fat and the flour too much, that means that you can't get the water in.
And by using the machine, you're not getting your hot hands into the dough.
And that was one half cup of chilled water that went in there.
And flour it lightly, and feel the consistency of that dough.
You see, it's a little bit... it's soft and pliable.
And I've always said-- I can't think of another simile-- it's rather like a little baby's bottom.
It has that lovely feeling to it.
And that's how you want it to be.
And then you wrap it up in wax paper, and it has to chill and rest, both chill and rest, you want the butter to congeal again.
And then... you have to-- particularly when you're using this instantized flour-- it has to rehydrate itself, absorb the water.
And also, the rest allows the gluten in the flour, in the dough, to relax.
And, actually, I think it's better, if you can do it, just to make your dough the day before.
Or you can even freeze it.
And now this is-- I'm just-- this is chilled, hard dough that I made yesterday, and I'm just beating it with a rolling pin to get it started.
Now, I want to show you what the quiche is so that you'll remember what we're doing.
You see, it's free-standing.
There's your shell.
It's not served in a pie plate.
And so, you want to bake it in something so that you can unmold it again, so that it looks like a quiche.
This one was a ready-made one, and it was baked in a pie shell.
So if you're going do the quiche yourself, either form it in a cake pan-- a straight-sided cake pan-- or use the French quiche ring, which you can buy most anywhere.
It's buttered it on the inside, and place it on a pie plate.
This is called-- usually called-- a flan ring, and this one is about eight inches in diameter.
And so roll the dough about 12 inches in diameter.
And start in the middle and roll out to the edge, and keep turning the dough as you do it so that you can roll it into a circle.
And I'm not using a regular rolling pin.
I'm just using a garage broom handle.
And this should be about 12 inches in diameter.
You have to have enough to go up and down the sides of the... of your mold.
And it should be about three-sixteenths inch thick, which is about the thickness of two quarters laid together, or a 50-cent piece, if you still have one of those.
Now, you may not start... you may not make the perfect dough at first-- and if you take too long in rolling it, it softens-- immediately refrigerate everything and continue, because you can't do anything with dough that is limp and soft.
There you see, I folded it into quarters, and then center the point in the middle of your pan or mold, and then unfold the dough around it.
And then we want to make the sides a little sturdier, so you lift it up, up the edge of dough and push it down with your fingers to make this-- to have a little more dough in the sides of the ring.
And if you find, for some reason, that the sides are not as sturdy as they should be, that one part seems a little bit thin, you can just wet it and put a little dough patch.
And you want the sides sturdy so that, when the quiche is baked, the sides will stay up.
And now, the second step is to take your thumbs and push the dough up all the way around.
You press to make a little decorated edge, you see?
Here, I'll do it with my fingers on that side.
See, that's just pushing it up.
And that's gonna make a little decorative edge which we'll make some little fork marks on.
And if it sticks to your thumbs, just rub them in a little bit of flour.
You want to work fast, and you want to keep everything cold, because once you have let the dough get a little bit limp, you're lost.
But just remember if you haven't done much dough before, any time it gets limp and soft, put it in the refrigerator, and then continue.
And now, take a fork, and make little decorated marks around the top.
I think, if you've never made dough before, you're a little scared at the idea.
But if you do try the machine, and if you remember to keep everything cold, I think you'll find you probably have to make it several times.
But you'll find that you suddenly get the feeling of it in your fingers.
Now there, you take your little fork and make little fork pricks at one quarter inch apart.
And be sure that you have a very thin, thin...
I mean, sharp pricking fork, 'cause you don't want to make great, big holes.
And these little holes in the bottom are to keep the pastry down as it bakes.
And then, I think this is a good idea.
Save your dough, 'cause you may need it later.
I think it's a very good idea, then, to refrigerate the shell for about half an hour, at least, or you can even refrigerate it for a day or two.
But I just think that it bakes easier because just by rolling the dough out, you have activated the gluten a little bit.
And you may find that... You may find that the shell won't bake terribly easily.
Now, you can fill and cook the shell as it is.
Here's a ready-bought one, and here's the homemade one.
But you risk having pastry that's not cooked in the bottom.
And I want to show you one here that was baked in raw dough, and I want you to see the bottom of it.
You see that, that's raw and soft.
That's gotten a little bit cooked around there, but that's just plain, really raw pastry.
And you want it crisp and brown.
And even though it's a little bit of a nuisance to precook it, I think you're gonna find that it's gonna be much better.
And nobody's gonna compliment you on your quiche if you have a soggy bottom, so I think it's much better to do the precooking.
And what you have to do-- the problem is that you have to weight it down with something.
And so, weight this one-- the homemade one-- weight it down.
This is some foil and some dried beans.
And you push the foil right up against the sides all around.
And be very careful that it goes all around the sides.
And the foil and dried beans you can keep for years.
I've had these beans-- some of them even came from Paris, from when we lived there.
But you see, that's thoroughly pushed on.
And for the ready-bought shell, follow the directions as to what they say.
In this one, it said, "Prick it all around, and then put an extra little aluminum pie plate on top."
And then these are both ready to bake now.
For the pre-bought shell, it also said to put a baking sheet under it.
So I'll follow exactly what it said.
And these are now to bake in a preheated, 450-degree oven.
And I'm putting them in about the lower middle and the middle.
I'll have to put that one up.
And after seven or eight minutes, look at them.
I'm gonna set the clock for seven minutes.
And I have something in here, which I'm gonna look at to see how it's doing.
Very nicely.
And then while those shells are cooking, we'll do the filling, but I want you to see the shells when they come out partially baked so that you'll know what problems, if any, there are.
Now a quiche-- let's look at this again so you can see-- it's just a custard, really, and if you think of it as a custard, I don't think you'll be scared of it.
Though quiche always sounds like such a fancy name.
And a custard is nothing but eggs and milk and a flavoring.
And when you put it in the oven, it sets lightly like this.
I'll just cut a piece off of that.
You can see that's a lovely, just a cheese quiche and a very nice one.
So I'm gonna start in with the mother of all quiches, quiche Lorraine.
And that is a mixture that has a bacon flavoring.
It's bacon and cream and eggs.
And this is the all-purpose quiche mixture.
You start out with three eggs.
There, part of the egg on the counter.
There's two eggs and one which makes three.
And then, you have-- I better put on my glasses so I can see them.
Well, I can't-- liquid that comes up to... along with the eggs, up to one and a quarter cups, between one and a quarter and one and a half cups.
And then you mix that all up so that the eggs get thoroughly blended.
And then it has a little bit of salt and pepper.
There's a little bit of pepper and about a quarter teaspoon of salt.
And a little bit of nutmeg.
And this is the all-purpose quiche mixture.
Just remember that, that it has... this is for an eight to nine inch shell.
It has three eggs, and you put them in a measure, and then pour in liquid and/or flavoring up to the one and a quarter mark.
And this doesn't have any cheese at all in it.
It just has the bacon.
And here, here is the bacon, cooked bacon.
And here's our cream mixture.
And, um, this... What's nice about the quiche is that you could make all of this ahead of time and simply refrigerate it.
Cover it and refrigerate it.
You can prebake your shell.
And then when you're ready to make your quiche, you just combine them all together.
So that, that's all there is for the quiche Lorraine mixture.
And remember that you don't assemble the quiche until just before you're baking and the baking only takes about half an hour.
And now for other quiches.
That's where the "and company" comes in.
We're going to have an all- purpose flavoring here, too, with some butter and some shallots or scallions.
That's about a teaspoon of shallots or scallions.
Then stir it all up.
And then, when you think of what you're gonna make, you have to remember that your quiche mixture-- just the eggs and the milk-- are rather bland, and the dough is rather bland, so that you have to have something that's going to... going to give a little excitement.
So, at least, the butter and shallots are going to help.
And you can do, um...
I'm gonna do spinach this way.
And you just want to stir this around and get it nicely impregnated.
I haven't got my frying pan hot, but what it's supposed to be doing is sautéing a little bit.
But you could use canned crab or cooked lobster meat or mushrooms exactly the same way.
And just remember to flavor up whatever you're gonna put in first.
Then...
I'm gonna flavor this up with a little bit of pepper and a little bit of salt.
And this would also have a little bit of nutmeg.
I've got about half a cup, half to three-quarters of a cup of spinach here.
And it's also nice for leftovers, too.
And now we have our all-purpose mixture.
Again, they're the three eggs-- there are two of them and the third one.
And a little bit of grated cheese.
This is about a quarter of a cup of cheese or two or three tablespoons of Parmesan.
I've used grated Swiss.
Mix up your eggs.
Just blend them.
Then in goes the spinach.
And this again can just be covered and refrigerated.
Mixed up, needs a little bit of cream.
When you have a solid, like spinach or mushrooms, you can put in a little bit more liquid because the... if it's just pure liquid, then it's when the thing only comes up to about one and a quarter cups.
In this case, this comes up to two cups.
And then taste it very carefully and see how the seasoning is.
And if it needs any more salt or pepper or anything else, put it in.
And then again, this is ready to go.
I'm gonna clean up a little bit here.
Now, I'm going to... presumably... these shells are gonna be ready to look at.
First let's see how that's doing.
That's doing very nicely.
I just want you to see how they look.
These haven't really been in quite long enough, but at least it will give you an idea of what they're supposed to look like.
Now...
Here's the-- this is the home-baked one.
And lift up your... your foil and beans, and you see that's still soft.
And if by any chance it might be that the sides have begun to sunk down, it's still-- sink down-- it's still soft enough so you can push them up.
Or if you've left it in a little bit too long, you can patch it with a little bit of raw dough.
Prick it again and put the foil and beans back in again, and then leave it in the oven until it has set.
And here's your...
This one hasn't quite set either.
But just keep looking at it, and usually, it depends on how thick it is.
It's usually ten to 12 minutes, and it's done when it's begun to shrink just very slightly from the pan, and just to show a slight bit of coloring.
And these, again, you can do ahead of time.
Here they are already done.
As you can see with that, it has just began to shrunk-- begun to shrink, yes-- a little bit.
So that's done in a very, very slight coloring.
And these, you can wrap and freeze.
You can get-- that's what's so wonderful-- you can do everything ahead of time.
I'll put the quiche Lorraine in here.
And here's about six pieces of cooked bacon, which I'm gonna crumble in the bottom of the shell.
Some people like to cook raw bacon in the shell, but I like to cook it ahead.
And now, here's our mixture of three eggs and cream.
And pour that in, and be very careful that you don't overfill the shell.
It's better to underfill than overfill.
That's just about right there.
It should be-- that's left about a quarter of an inch.
Which is a very good idea, because if it comes over the shell, you may have little troubles in the oven.
And then put on a little bit of butter on the top, 'cause that'll help make a nice brown.
That's all moved around a little bit.
And if you notice, I'm leaving the ring on.
I think it's sensible to do so.
And also, with this store-bought, this ready-made shell, I'm leaving the plate on, because we can undo it afterwards, I hope.
Now I'm gonna put the spinach in this.
And that was, you remember, about half a cup of spinach, three eggs and some cream, and also, cheese.
'Cause this puffs up.
It's gonna puff up when it cooks, and that's one reason that you don't want to overfill.
I baked one of these ready-made shells.
I prebaked it-- I'm putting a little cheese on the top here-- I prebaked it, and then for the final baking with the filling, I've baked it without this little protected... protective, uh, shell on-- I mean, pan on, and it sort of collapsed.
Now these are-- you're doing-- you fill them just at the very last minute.
And in they go... to a 375 degree oven.
And they'll take about half an hour to bake.
Now... we're gonna see how our ready ones are.
And I hope that they are baked exactly right.
As you'll see, one is-- if you have two of them-- one is in the upper middle, and the other one is in the middle level.
My, those look pretty good.
As you see, how much this one has puffed up.
And it... it's not done until it is actually puffed about like this, is the quiche Lorraine.
That's the one that just has the bacon flavoring, is the one that puffs up the most.
And this is the Quiche aux épinards, the spinach quiche, which usually doesn't puff quite as much.
(dishes clattering) Now they're ready to unmold.
I'll unmold the quiche Lorraine.
And have a flexible spatula and just slide it onto your plate.
There's that one.
And now... presumably-- aw, this is supposed to come off.
I hope so.
I had a friend who just did one the other day.
She said it came off very nicely.
But you certainly want to serve them freestanding.
Yeah, that is gonna come out very nicely.
Yeah.
Fine.
That's much better.
It's much better served-- cooking it in the pie plate than not.
This one, if you can see, this one collapsed quite a bit because I didn't keep the pie plate on.
So in other words, this has worked very nicely.
And then you can serve these warm or hot.
And if you want to hold them, keep them in a, sort of a warm oven, and they'll stay warm.
But don't let them dry out in the oven.
They'll stay puffed for a good ten minutes in the oven with the... turned off oven with the door ajar.
Now I'm gonna serve them.
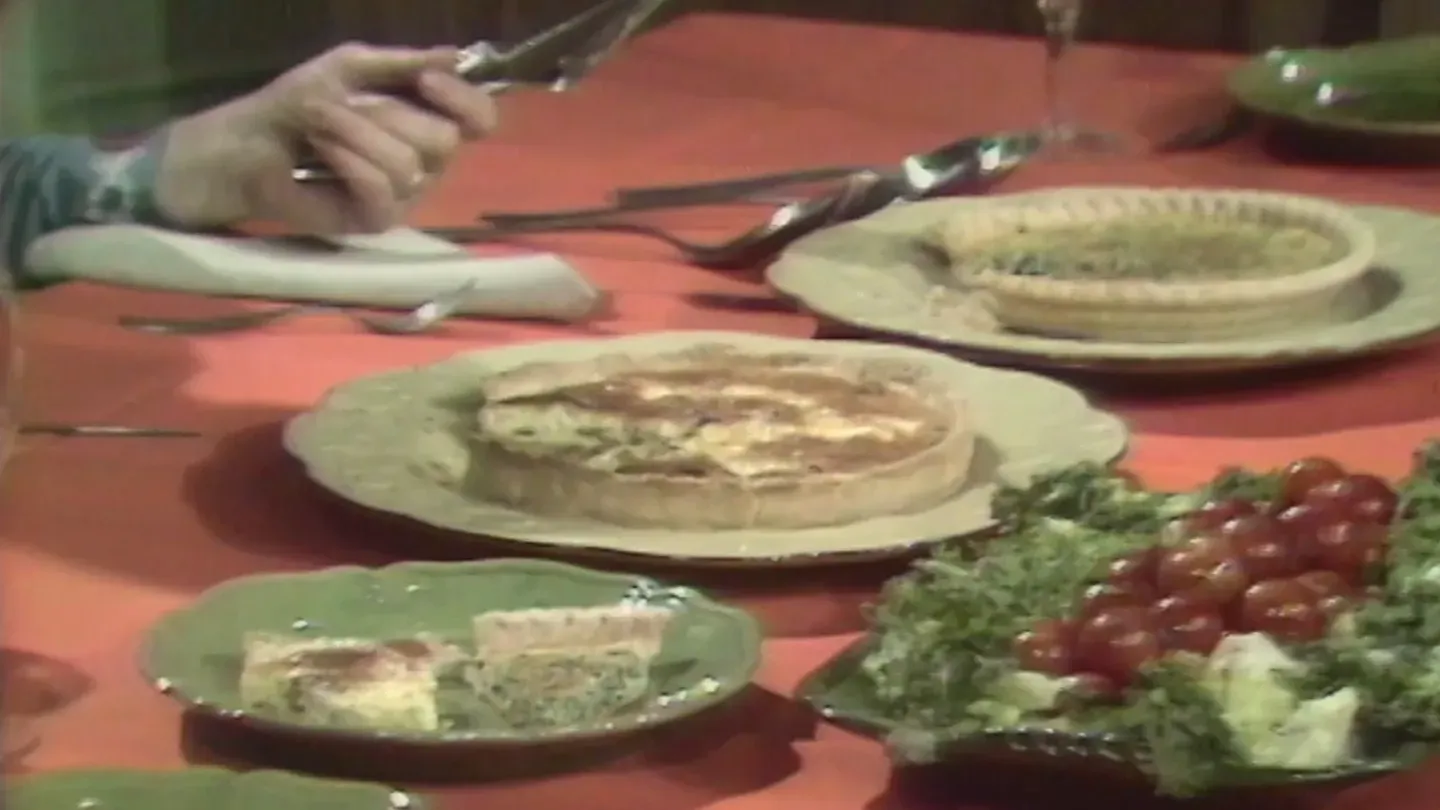
And here is the quiche Lorraine.
Then I'm gonna serve a piece of the spinach quiche.
And the spinach quiche is with the boughten pie crust.
I must say it turned out very nicely.
There you are.
And a little salad of tomatoes and lettuce is really all you need.
Plus a bit of white wine, like a nice Rhine wine.
Now, a quiche looks very dressy, and it smells wonderful, and it's absolutely delicious.
So never tell anyone how fast and simple they are to make.
Then, next time you have sudden company, keep yourself wrapped in mystery, and to everyone's amazement, serve up a quiche.
That's all for today on The French Chef.
This is Julia Child.
Bon appétit.
ANNOUNCER: This program was made possible by a grant from Polaroid Corporation.
Julia Child is the author of From Julia Child's Kitchen, which includes the recipes from this program.
Captioned by Media Access Group at WGBH access.wgbh.org


